Monday, August 30, 2010

Sweet Trick or Treat!

This is a card that I am submitting for the Peachy Keen Challenge #35. This is a sketch and color challenge. Details to follow :)
Isn't this little girl cute!
Recipe:
Cricut Cartridge~ Mini Monsters~ I cut this cute little candy corn girl at 3 inches
                            Plantin Schoolbook~ circle and rectanges
Paper~ Solid cardstock from my stash, C'ordinations for the vertical rectangles~ I sanded it to reveal tht teal core, Patterned paper is from K&Company
Glossy Accents~ I applied this to the candy corn
Nestabilities scalloped circle
Brads from my stash~ these were not the right colors so I colored them with my Bic It markers
Pop Dots
Peachy Keen stamps~ Everyday Paperdoll Faces ~ I used the hide contour feature in my Gypsy to hide the little girls face. I love these little face stamps!

Enjoy your evening!
~Saundra

Saturday, August 21, 2010

Halloween Tent Card

I made this card for Emma's Throwback Thursday Challenge. This week the challenge was to make a project using Cricut Paper Doll Dress up and "Frame" it. I decided I would try my hand at a tent card. I found the tutorial for this on Split Coast Stampers.
side view

Here are the details...

Cricut Paper Doll Dress Up ~ cat, bat, and fence. I used my Gypsy to make black outs of the cuts by using the hide contour feature. I also used Plantin School Book for the rectangle and circle cut outs.

Paper~ patterned paper is K&Company Halloween 2009 stack, solid is just paper I got from my stash

Ribbon ~ American Crafts

Punch ~ Martha Stewart Drippy Goo

Gelly Roll Pen for doodling

Thanks for stopping by.

~Saundra :)

Thursday, August 12, 2010

Wedding Card

I made this card a few days ago for a couple at our church who just got married this past weekend. It was pretty easy to put together and I think it came out with just the elegant look I was hoping for.
Isn't it lovely! It was really quite simple to make.
This card is an A7 card (5x7)
Here's the recipe:

Cricut Cartridge~ Wild Card~ I used the wedding cake card but didn't cut the whole thing out. Here is
what it looks  like on my Gypsy:
(I don't know why blogger is uploading this on it's side but I can't seem to get it turned.) Anyway, I moved part of the cake off the mat so it wouldn't cut the two sides of the card. I also used the hide contour feature in my Gypsy for the base of the cake and sized it to shadow the top layer. I then cut the cake again without the hide contour feature. I cut the the pieces apart on the this second part and ran it through the Cuttlebug.

Cuttlebug~ Swiss Dots folder for the cake and Mosaic folder for the background piece
Martha Stewart Lace Punch
Martha Stewart light blue ink
Ribbon from Hobby Lobby
Flower from Paper Studio
Bling from stash
Stamp~ Fiscars
Pop dots

Thanks for stopping by! As always I appreciate your encouraging comments.
~Saundra

Tuesday, August 10, 2010

Yummy Treat Bag!!

I wanted to share the little treat bag I made for my students to take with them when they came for our school's orientation. I was in a really big rush that day and actually had my youngest daughter adding the stitching while I was in a teacher's meeting. We got these finished 5 minutes before our school's doors were opened. The only thing I would have added if I had had time was a bow out hemp for the little horse but all in all I am happy with the way these turned out and the cookies were scrumptous!!

The recipe:

Cricut Cartridges ~
Simply Sweet , I cut the letters in shadow feature
Paperdoll Dress Up, For the first layer, I used the hide contour feature in my Gypsy to make a blackout cut for the horse and then I cut two more horse in regular cut and used them to piece the horse's face and mane the way I wanted them.

Paper is just solid card stock that I had in my stash
Clear bags
Distress Ink ~ Tea Dye
stapler
adhesive
White Gelly Roll Pen

Thanks for stopping by. I really am just so humbled by all your many comments but I do enjoy them.
Hugs,
Saundra

Monday, August 9, 2010

Class Room Pics 2010

Hi Everyone! These are a few pics I took of my classroom. I am a thrid and fourth grade teacher at a private Christian school and have been for the last 7 years. This year I am doing a western theme for my decorations and I just love it! Many of the decorations on the walls I made 2 years ago. I took some clipart that I had on my computer and blew it up with an overhead projector, traced with a black sharpie, and then colored the pictures in with chalk. This year when I decorated I was able to use some Cricut cuts to add to the theme. We started school today so hopefully as we get back into routine I will be able to find some time to play in my craft room again. I hope you enjoy!
~Saundra

This is a picutre of my door. I used Paperdoll Dress up for the cowboys/girls and Gypsy Font for the names and greeting. I welded the fonts in my Gypsy. This is a very easy font to weld.

Looking into classroom
Bulletin Board


Sherrif
Laughing Cactuses

I used Pooh Font for the titles.

Saturday, July 31, 2010

I Love You Anniversary Card and Challenge

Wow! It's been a busy week. I had to get my class room ready since school will be starting on the 9th. This is the first time this week that I got to make something. I made an anniversary card for my husband. Tomorrow we will have been married 23 years. Time surly does fly. I used the bird from Cricut Create-A-Critter which also made it great for the challenge over at Fatabulous Cricut Challenge Blog. The challenge was to use a Cricut cut of an animal.

Recipe:

Cricut Create-A-Critter ~ birds, sentiment, and top note. I welded the topnote shade at the top and the two birds in my Gypsy.
Paper~  DCWV Baby Girl Stack and Papertrey Ink for all the solids
Bling for the eyes
Cuttlebug~ D'Vine Swirls and Swiss Dots
Flower from my stash
Distress Ink ~ Tea Dye

Thanks for stopping by!
~Saundra :)

Friday, July 23, 2010

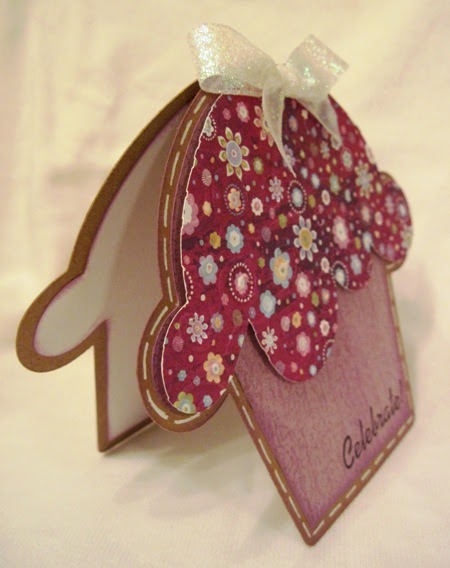
Celebrate! ~ Throwback Thursday Challenge #8 and Cricut Cardz Challenge #34

It's Throwback Thursday Challenge time over at My Creative Time with Emma and this is my submission for this week's challenge. I'm also submitting this for Cricut Cardz Challenge with Mary. For Emma's challenge we are to make a project for a birthday and use the Cricut Celebration Cartridge or an older Cricut Cartridge. For Mary's challenge we are to make a project with a cupcake, cake, candy, or cookies using any cartridge and colors we want.


The card measures about 5 inches. I thought it came out very cute and was quite easy to put together.
Enjoy your weekend!
Saundra :)

Here is the recipe:
  • Cartridge ~ Doodlecharms ~ I cut the cupcake at about 7.5 inches. I welded 2 cupcakes using my Gypsy on the shadow feature. I didn't want to use the candle on the cupcake so I welded these at the top. I then cut the cupcake again using the blackout feature and trimmed off the candle. I cut the frosting layer and used the hide contour feature to hide the candle and sprinkles.
  • Paper and ribbon is from my stash
  • Jelly roll pen for doodling
  • purple ink for the edges
  • Cuttlebug ~ D'vine Swirls for the frosting
  • Sentiment ~ Inkadinkado Stamps
  • glue dots
  • pop dots